Factors affecting bending accuracy
1.Mold factors
The mold is the primary factor affecting the bending accuracy. The mold is the main tool for bending the workpiece. The shape and size of the bent part mainly depend on the dimensional accuracy of the working part of the mold. The higher the precision of mold manufacturing, the more accurate the assembly, and the higher the dimensional accuracy of the workpiece obtained. In addition, the reliability and stability of the mold positioning device also have a great influence on the dimensional accuracy of the workpiece. If the mold positioning is inaccurate or unstable, it may cause the workpiece size deviation, which in turn affects the overall accuracy. Deformation, damage, wear, and other phenomena of the mold will affect all aspects of bending forming. Different cores of the upper and lower molds will also cause deviations in the bending size. After the back gauge moves left and right, the relative distance from the lower mold changes. Finally, at one end of the bending machine, that is, when processing with a single-side load, the bending pressure will be affected, and it is also harmful to the machine tool.
2.Plate and workpiece factors
The influence of materials on the accuracy of bent parts cannot be ignored. First, the mechanical properties of the materials are unevenly distributed. For workpieces bent from the same sheet material, the shape and size of the workpieces will be different due to different stress and rebound values, resulting in certain dimensional deviations. Secondly, uneven material thickness will also affect the bending accuracy. Even if the same bending mold is used for bending, the size and shape of the workpieces obtained from materials with different thicknesses will be different. Thick materials have greater resistance and less rebound when bending; while thin materials have greater rebound, inaccurate shapes and sizes, and are prone to warping and twisting. Uneven loads are most likely to cause machine tool deflection. For example, the working length of the bending machine is 3200mm, and the tonnage of the oil cylinders distributed on its left and right sides is 100t. When there is a load, the upper and lower sliders will bend and deform, thereby reducing the actual displacement of the slider in the middle part, causing the workpiece to have inconsistent angles along the entire length direction, and the middle angle is larger than the two ends, which directly affects the dimensional accuracy of the workpiece. Different grades of materials will have different degrees of deviation in thickness and hardness. There are also differences in thickness produced by different manufacturers. If the burr on the positioning edge of the material is very large or there are large joints, and the expansion of the material end caused by forming processing will affect the accuracy of the bending size. Or when the plate is rolled, it will rebound due to uneven force, resulting in errors in accuracy. In addition, when the local temperature of the material changes, errors will also occur. The bending deformation of the material is a transition from elastic deformation to plastic deformation. The mechanical property rebound angle of the material is proportional to the yield limit of the material and inversely proportional to the elastic modulus. The free bending method has the largest rebound amount, the correction bending has the smallest rebound amount, and the bottom pressing bending is between the two; the rebound amount of sheet metal bending decreases with the increase of sheet thickness. During gap bending, due to the change of bending stress, the plate will produce the largest rebound bending stress generated on the outer surface of the bent part of the material. To obtain a satisfactory bending angle, "excess bending" needs to be implemented, but in actual bending, bending in various directions can exist at the same time, resulting in different rebound amounts of each part, causing inconsistent bending angle accuracy.
3.Process and process operation
The process and process operation also have an important influence on the bending accuracy. When the number of processes for bending the workpiece increases, the cumulative error caused by the deviation of each process will increase. In addition, the different order of the processes before and after will also have a great impact on the accuracy. In terms of process operation, the installation, adjustment and proficiency of the bending die have a direct impact on the accuracy of the workpiece. If the installation is not accurate, it will not only reduce the quality of the workpiece, but also cause waste. At the same time, the accuracy of feeding and positioning of the blank during operation will also affect the shape and size accuracy of the workpiece.
Solutions
1.Mold precision and maintenance
First of all, the mold should be continuously maintained. Continuous basic mold maintenance should be done carefully, patiently, and step by step. Do not blindly carry out it. When repairing the mold due to a fault, a material tape must be attached to facilitate the query of the problem. Open the mold, check the mold condition against the material tape, confirm the cause of the fault, find out the problem, and then clean the mold before dismantling the mold. The force should be uniform when dismantling the mold. For the mold structure where the unloading spring is between the fixed plate and the unloading plate and the unloading spring is directly against the inner guide column, the unloading plate should be dismantled to ensure that the unloading plate is balanced and ejected. The inclination of the unloading plate may cause the upper mold in the mold to break. Secondly, the upper and lower molds should be well maintained. When disassembling the upper and lower molds, pay attention to the original condition of the mold so that it is convenient to restore it during the subsequent mold installation. If there is padding or displacement, the thickness of the gasket should be engraved on the part and recorded. When replacing the upper mold, try to insert the unloading block to see if the lower mold is smooth, and try to insert the gap with the lower mold to see if it is uniform. When replacing the lower mold, try to insert the gap with the punch to see if it is uniform. After the upper die is repaired and ground, the upper die becomes shorter and needs to be padded to reach the required length. Check whether the effective length of the upper die is sufficient. When replacing a broken upper die, find out the reason and check whether the corresponding lower die has broken edges and whether the edges need to be ground. When assembling the upper die, check whether there is enough clearance between the upper die and the fixed block or fixed plate. If there is a pressure block, check whether there is a margin of movement. When assembling the lower die, place it horizontally, and then place a flat iron block on the lower die surface and tap it into place with a copper rod. Do not place it obliquely and forcefully. The bottom of the lower die should be chamfered. After installation, check whether the lower die surface is level with the die surface. After the upper die, lower die and die core are assembled, check the material belt to see if the parts are installed incorrectly or reversely, check whether the lower die and the lower die pad are installed reversely, whether the blanking hole is blocked, whether the new parts need to be stolen, whether the stolen materials are sufficient, and whether the parts that need to be locked are locked. Pay attention to confirm the locking of the stripper plate screws. When locking, tighten from the inside to the outside, and cross-lock with balanced force. Do not tighten one screw first and then tighten another screw to avoid tilting the stripper plate, causing the upper mold to break or reducing the mold accuracy. Finally, the mold gap should be adjusted. The core positioning hole is worn due to frequent assembly of the core, resulting in a large gap after assembly (loosening after assembly) or uneven gap (positioning deviation), which will cause the cross-section shape to deteriorate after punching, the upper mold is easy to break, and burrs are generated. Appropriate gap adjustment can be made by checking the cross-section condition after punching. When the gap is small, the cross-section is small. When the gap is large, the cross-section is large and the burrs are large. A reasonable gap is obtained by shifting. After adjustment, appropriate records should be made, and marks can also be made on the lower mold edge for subsequent maintenance operations. In daily production, attention should be paid to collecting and preserving the original material strips when the mold is in the best condition. If the subsequent production is not smooth or the mold varies, it can be used as a reference for mold maintenance. In addition, the auxiliary systems such as whether the ejector pin is worn, whether it can eject the material, and whether the guide pins and bushings are worn should be inspected and maintained.
2.Machinery and plates
Choose metal sheets with uniform mechanical properties to reduce the bending accuracy error caused by uneven materials. Ensure the straightness of the reference surface of the sheet is accurate and the stress of the metal sheet is uniform to avoid dimensional deviation caused by different stress and springback values. Check whether the thickness of the sheet is consistent. The material thickness can directly affect the bending coefficient and thus the bending accuracy. Because the workpiece is not parallel enough to the lower die during bending, the workpiece will rebound after the upper die is pressed down, affecting the bending size. The material properties and thickness will affect the bending angle, so each workpiece must be inspected first and the random inspection must be strengthened when bending. You can purchase from large steel mills and strengthen the thickness size inspection. Try to use the same batch of steel plates to make a sheet metal product, and check the bending coefficient with the same batch of steel plates.
3.Process control operation
Gap bending is an important part of bending parts processing. When performing gap bending, the entire processing process is mainly to use the gap between the upper and lower dies to achieve processing suspension. The lower die will not be in contact, so positioning and processing at the bottom of the stroke should be avoided as much as possible. At the same time, the opening depth of the upper die entering the lower die should be reasonably adjusted to obtain the required bending angle. Therefore, using this excessive bending method, a variety of opening angles can be obtained on the die that are greater than the actual opening angle of the lower die. The process measures to improve the bending accuracy of the gap bending method overcome the accuracy error caused by uneven materials during bending. When selecting the angle of the lower die opening, a lower die width that can meet the processing requirements of the bending part should be selected. If the opening of the lower die is too wide, the inner bending radius of the workpiece being processed will be too large, the pressure will be reduced, and the rebound will increase. When the opening width is too small, the pressure will be too high and the load will be too large. Therefore, for general workpieces, the material with the inner bending radius equivalent to the material thickness should be selected to control the opening width of the lower die through them. Reduce the flexural deformation of the machine tool itself. Reducing the degree of deflection of the machine tool itself is a simple way to improve the bending accuracy of the workpiece. The fundamental starting point is to ensure that the deformation of the upper and lower sliders is consistent. This consistency ensures that the workpiece obtains a good consistent angle over the entire length. The process measure to achieve this goal is to set an inclined wedge structure above the upper die to compensate for the deflection error caused by the upper die block of the machine tool. The mechanism of springback can make full use of the law of springback. When the workpiece is close to pure bending, the upper die plate is pressed by adjusting the stroke to adjust the force of the bending part. At the same time, combined with the change of the relevant angle of the die and the size of the process fillet, the shape of the bending die is appropriately modified to obtain a suitable angle and a reasonable bending depth.
4.Human control
In modern sheet metal bending production, even if there are automated equipment, some factories will not choose to equip robots, follow-up vehicles and other automated equipment due to insufficient funds, and continue to use manual production. The bending master relies on experience to operate, and one inch more or one less will cause inaccurate positioning. At this time, the post-positioning system is particularly important.The experience and techniques of the operator affect the bending accuracy. The worker pushes the material too hard or too little, resulting in positioning gaps or sheet bending, affecting the bending size accuracy; the worker's bending speed is not synchronized with the machine tool speed, which will cause the bending angle to be too large or too small. Therefore, the bending workers should be skilled and experienced, and do not change operations frequently. Sheet metal process personnel should be familiar with the principle of sheet metal unfolding, and can accurately determine the accurate bending coefficient based on theory and practice. Regular training activities should be organized to improve the operating skills of employees, reduce the probability of errors caused by misoperation, and strengthen the correct operating procedures and adjustment methods of operators to reduce human errors.
Recommendation: DURMAPRESS LaserCheck for press brake
There are many factors that affect bending accuracy, including molds, plates and workpieces, processes and process operations, human errors, etc. In order to improve bending accuracy, it is necessary to start from these aspects and take corresponding measures to control them. Only in this way can we ensure the overall improvement of bending quality and meet the needs of product manufacturing.There are many factors that affect the bending accuracy, including molds, plates and workpieces, processes and process operations, human errors, etc. In order to improve the bending accuracy, it is necessary to start from these aspects and take corresponding measures to control them. Only in this way can we ensure the overall improvement of bending quality and meet the needs of product manufacturing.
1.DURMAPRESS LaserCheck for press brake
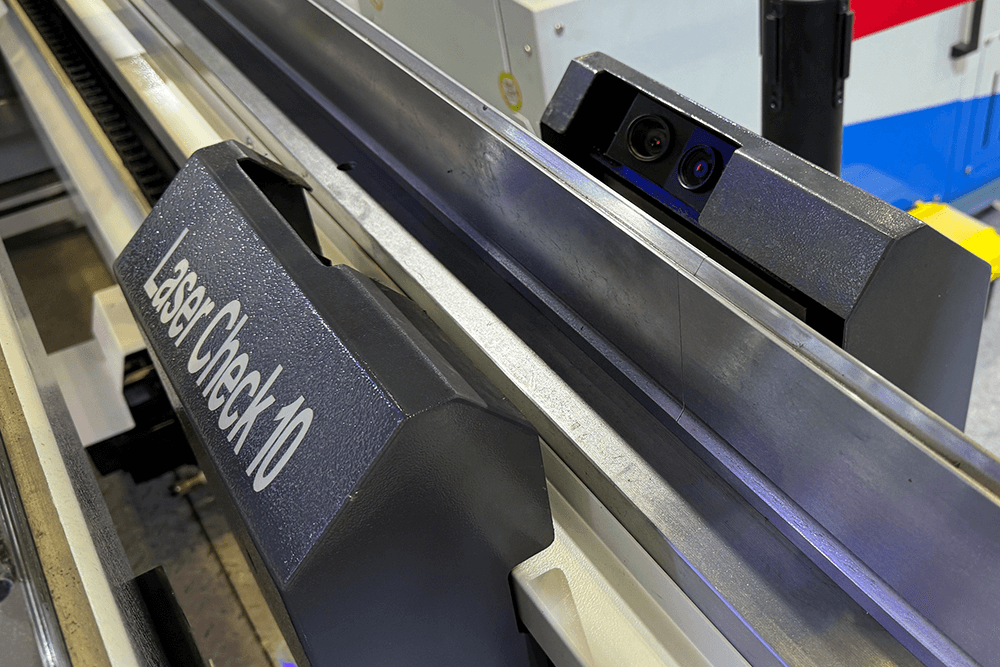
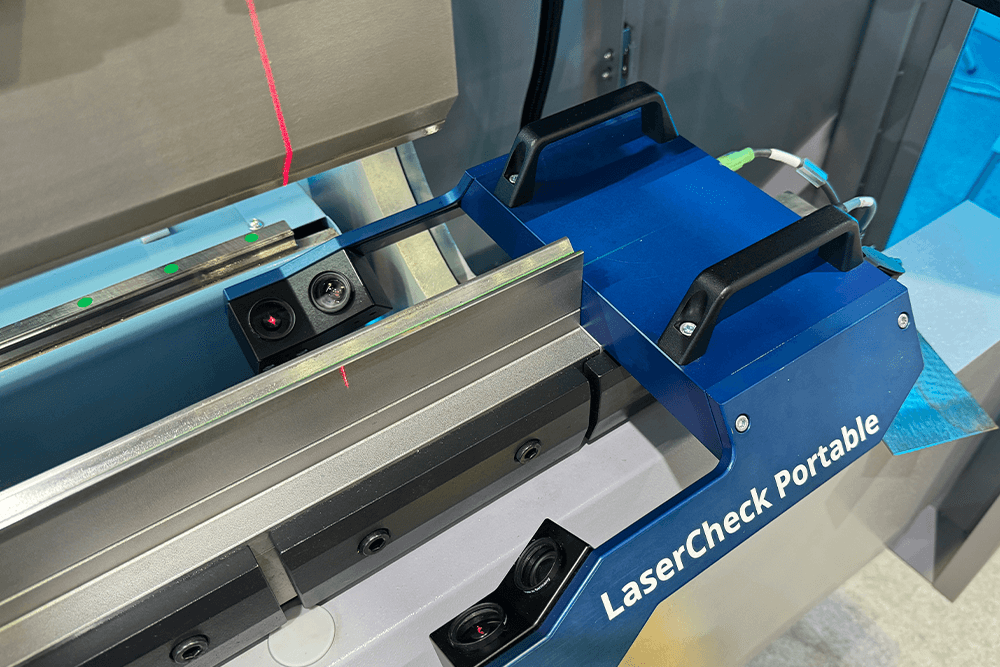
Now we recommend a product of DURMAPRESS: Lasercheck for press brake. It can detect the characteristics of different plates in the middle of the slider pressing down, maintain real-time communication with the CNC system, calculate and control the precise position of the slider bottom dead point, and adjust it through CNC control Y1, Y2, and deflection compensation system to ensure that the preset perfect effect is achieved in the first bending, and the bending accuracy can be improved very smoothly! Manufacturing sheet metal parts with accurate bending angles that are always kept constant often meets a problem during the production process: different parameters in material thickness and stresses.To solve this problem and ensure the safe use of minor-quality materials, it has developed a powerful solution for measuring bending angles in press brakes: the LaserCheck.
2.LaserCheck quick facts and advantages
LaserCheck enables the user to determine the exact bending angle for press brakes using laser triangulation—and it works contactless. It is a laser-based bending angle measuring system, an innovative sensor for measuring bending angles in press brakes. It is a high-tech product "Made in Germany", with very high precision and works contactless. It can be integrated into existing press brakes without tool modification in parallel, using 2 or 4 sensors. It calculates spring back by force detection using strain gauges or detecting the end of the angle change and can be connected to ESA, Cybelec, Delem, Amada, Robosoft controllers, and other devices. It is an integrated OEM solution for ESA, Amada, Robosoft, and other devices. Its advantages are uninterrupted bending process, fast bending process and springback measurement without force measurement.
About Us
Durmapress specializes in designing, manufacturing and selling various metal processing equipment, including bending machines, shears, punches, laser cutting machines, etc. The company was founded in 2000. With years of experience and technology accumulation. DurmaPress has become one of the well-known brands in China's metal processing machinery industry.
Contact Us
Recent Posts
Categories
Follow Us
Weekly New Video
Contact us for more information
If you have any information about our products, please contact us and we will reply within 24 hours.



-300x169.jpg)

