At present, many companies do not pay attention to the daily management of equipment. Improper use and maintenance of equipment. Or the equipment is used excessively or the operator does not use the equipment according to the equipment operating procedures, resulting in serious loss of equipment accuracy. Some small and medium-sized enterprises will purchase some second-hand equipment, but lack the technology and methods to detect equipment accuracy. They usually judge the intact condition of the equipment based on its age, efficiency, and appearance, ignoring the mastery of equipment processing accuracy and processing capabilities.
The press brake is one of the key equipment for forming sheet metal products and ensuring the processing accuracy of sheet metal products. The accuracy of the bending equipment will directly affect the processing accuracy of sheet metal products. The impact of insufficiently accurate bending equipment on product deviations is long-term and objective. If the accuracy status of a bending equipment can be detected, it is very necessary to provide equipment accuracy data for the company to accept and repair the bending equipment.
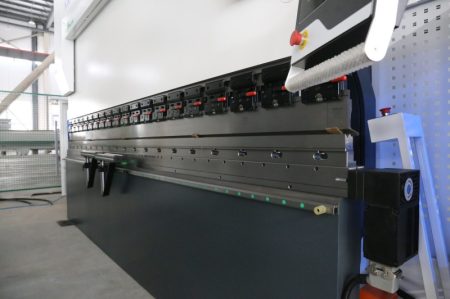
The national standard GB/T14349-2011 "Precision of press brakes" stipulates accuracy inspection, inspection allowance and detection methods for the accuracy of press brakes. The inspection items of bending equipment include the inspection of geometric accuracy and working speed of the press brake, which are explained as follows.
test
Geometric accuracy testing items
- Lateral and longitudinal flatness of machine tool work surface
- Parallels between the horizontal support surface of the upper mold fitting surface and the plane of the machine table
- Verticality of the slider to the working platform
Regarding the detection of geometric accuracy
The author believes that machine tool purchasers can require suppliers to provide geometric accuracy data without having to do geometric accuracy self-tests themselves. It is only necessary to detect the working accuracy of the machine tool to verify the purchasing accuracy of the machine tool. Machine tool users can make planned arrangements for annual work accuracy testing of machine tools. If the working accuracy exceeds the allowable range of the machine tool accuracy, consider testing the machine tool geometric accuracy. Considering that the vast majority of companies do not have the ability to repair large and medium-sized machine tools, and professional maintenance agencies generally accept the repairs, this article does not introduce the geometric accuracy testing of press brakes in detail. If you need to master the geometric accuracy of detection, you can refer to the relevant content of the national standard GB/T14349-2011 "Precision of press brakes".
Impact on work accuracy
The influence of bending machine worktable flatness (longitudinal) on the straightness of bending parts
1. Effect of workpiece angle accuracy
When there is a longitudinal flatness error on the workbench, it will affect the depth of the upper die into the notch of the lower die.
2. Effect of workpiece straightness accuracy
When there is a flatness error on the work surface, the straightness of the bent part is equal to the flatness error.
3.The influence of press brake table flatness (lateral) on the angle and straightness of bent parts
The influence mechanism of the flatness (transverse direction) of the press brake table on the angle and straightness accuracy of the bent parts is the same as the "longitudinal influence" mechanism.
Work accuracy inspection
Inspection conditions
Test piece requirements
Length requirements (length deviation is ±3mm)
| Workbench Length (mm) | Specimen Length (mm) |
|---|---|
| ≤2000 | l |
| >2000~3200 | 2000 |
| >3200~5000 | 3000 |
| >5000 | 4000 |
Width requirement: The width of the test piece shall not be less than 100mm. (*Width deviation is ±0.2mm.)
Thickness requirements
| Nominal Force (kN) | Specimen Thickness (t) |
|---|---|
| ≤1000 | 2 |
| >1000~2500 | 3 |
| >2500~6300 | 4 |
| >6300 | 6 |
Material requirements: The test piece material is Q235A steel plate, and the tensile strength of the material is σb≤450MPa.
Number of pieces: The number of test pieces should not be less than 3.
Mold requirements: The opening size of the lower mold for the test piece is 8 to 10 times the material thickness.
Position requirements: The test piece should be placed in the middle of the workbench.
Bending angle requirements: The bending angle of the specimen is 90°.
Measurement position: Start measuring 100mm from the end of the test piece.
Inspection tool requirements
Qualified flat ruler, universal angle ruler, and feeler ruler.
General requirements
Before working accuracy testing, the equipment needs to be leveled, and the horizontal and vertical directions should not exceed 0.2/1000.
Test piece discount rate test
Charge or difference
0.05mm over 1000mm length.
Detection method
Place the 1000mm flat ruler detection surface against the edge of the bent specimen (see the picture below), and use a feeler gauge to measure the gap δ between the two. The error value is calculated based on the maximum gap value within 1000mm.
Secondary bending test piece
If the material stress of the test piece is large, the test piece can be bent twice (see the figure below). Test the working accuracy of the bending machine.
conclusión
From the analysis of a set of reference testing data provided by the press brake tool manufacturer, the impact of the longitudinal error of the press brake table on the bending accuracy is about three times that of the transverse error. The impact value of the bending angle deviation is about 3 times the flatness error of the workbench.
The bending angle deviation has little effect on the verticality of the working surface due to the slider stroke and can be ignored. The straightness of the work surface will directly reflect the straightness deviation of the work piece, and the two are almost equal. The bending straightness deviation is less affected by the slider stroke and the verticality error of the working surface. The work table mentioned in this article includes two, one is the machine table, and the other is the geometric accuracy of the horizontal support surface of the upper mold fitting surface. for example:
The length of the working table of a certain press brake is 3200mm. After measuring the working accuracy of this press brake, the following data were obtained: the straightness deviation of the workpiece is 0.06mm, and the bending angle deviation is 0.1720. It can be inferred from this that the flatness of the work surface of this press brake is about 0.06mm.
According to the national standard GB/T14349-2011 "Precision of press brakes", the flatness margin of a press brake with a table length of 3200mm is 0.08mm. From this, it can be determined that the flatness accuracy of the press brake is qualified. In fact, as a user of a press brake tool, you only need to pay attention to the working accuracy of the machine tool.
Because the working accuracy of machine tools after long-term use is not only affected by the factors mentioned in this article, the transmission clearance and mechanical wear of the machine tool that affect the accuracy of the work piece must also be taken into consideration, and the machine tool should be evaluated and considered comprehensively. That is to say, through the inspection of the working accuracy of the machine tool's bending parts, combined with the national standards for the accuracy of the press brake, the comprehensive precision processing capabilities of a press brake can be inspected and judged.
Quiénes somos
Durmapress se especializa en el diseño, la fabricación y la venta de diversos equipos de procesamiento de metales, como plegadoras, cizallas, punzonadoras, máquinas de corte por láser, etc. La empresa se fundó en 2000. Con años de experiencia y acumulación de tecnología. DurmaPress se ha convertido en una de las marcas más conocidas de la industria china de maquinaria para el procesamiento de metales.
Póngase en contacto con nosotros
Entradas recientes
Categorías
Síguenos
Nuevo vídeo semanal
Más información
Si tiene alguna información sobre nuestros productos, póngase en contacto con nosotros y le responderemos en 24 horas.


-300x169.jpg)

